Use coordinates without relying on disc colours
The diagrams label columns A through H from left to right. Row 1 is at the top and row 8 at the bottom. T identifies your side, R the opponent, and a dot an empty square. These labels belong to the explanatory boards; they are not extra buttons or a new mode in the game.
Before considering a square, identify the side to move. A location can be legal for one side and unavailable to the other. Then find the friendly disc that would close its capture. A coordinate without a position and a turn is not enough information to recommend a move.
Start with the C4 opening capture
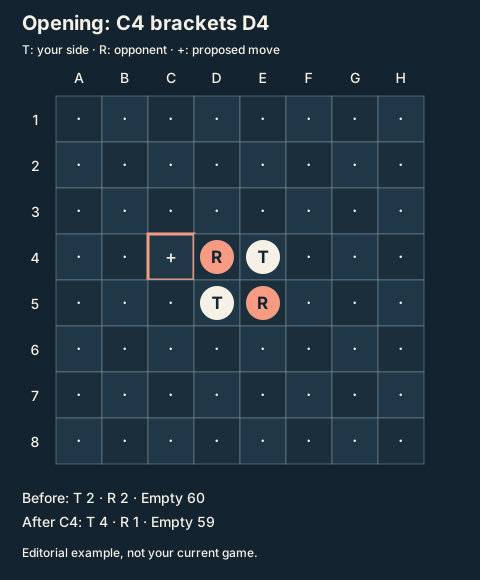
Our starting position has T discs at E4 and D5, with R at D4 and E5. T can choose D3, C4, F5 or E6. Playing C4 creates a horizontal line through the opposing disc at D4 to the friendly disc at E4. There is no empty square interrupting that line.
The move adds a T disc at C4 and turns D4 into T. Two discs on each side become four T against one R. Check the addition and the flip separately: one disc is new, while the other was already present. A capture changes ownership; it does not place a second new disc on the board.
| Row | A | B | C | D | E | F | G | H |
|---|---|---|---|---|---|---|---|---|
| 1 | · | · | · | · | · | · | · | · |
| 2 | · | · | · | · | · | · | · | · |
| 3 | · | · | · | · | · | · | · | · |
| 4 | · | · | + | R | T | · | · | · |
| 5 | · | · | · | T | R | · | · | · |
| 6 | · | · | · | · | · | · | · | · |
| 7 | · | · | · | · | · | · | · | · |
| 8 | · | · | · | · | · | · | · | · |
See why the C3 reply is legal
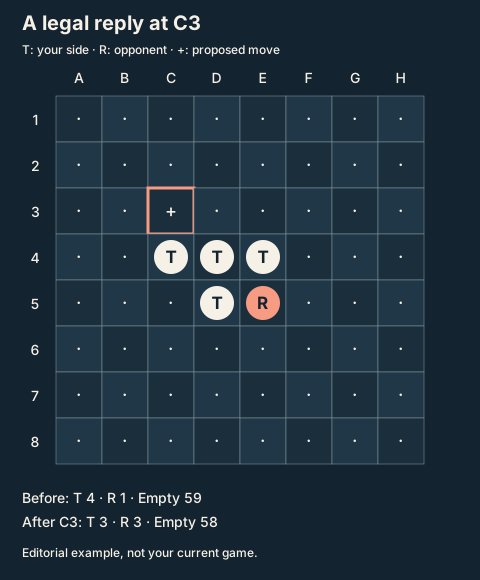
R now has the turn. In our chosen continuation, C3 brackets D4 on the diagonal ending at E5, which still belongs to R. D4 changes sides again. This does not undo the earlier move: C4 remains occupied by T, and the new opposing disc is placed at C3.
The resulting count is three T and three R. That short sequence distinguishes temporary ownership from permanent protection. Flipping D4 did not reserve it for the rest of the match. The example follows two legal decisions to explain the rule; it does not claim that the game’s computer always replies at C3.
| Row | A | B | C | D | E | F | G | H |
|---|---|---|---|---|---|---|---|---|
| 1 | · | · | · | · | · | · | · | · |
| 2 | · | · | · | · | · | · | · | · |
| 3 | · | · | + | · | · | · | · | · |
| 4 | · | · | T | T | T | · | · | · |
| 5 | · | · | · | T | R | · | · | · |
| 6 | · | · | · | · | · | · | · | · |
| 7 | · | · | · | · | · | · | · | · |
| 8 | · | · | · | · | · | · | · | · |
Look along eight separate rays
From the proposed placement, look up, down, left, right and along the four diagonals. Each ray needs consecutive opposing discs followed by a friendly closing disc. Check the directions separately, even when one valid line has already established that you are allowed to play on the square.
Newly flipped discs do not trigger a second wave of captures from their own positions. The relevant lines start at the disc placed on this turn. If a shape seems to capture by following a path with a bend, return to the starting square. A bend is not a straight capturing line.
Work through a move with multiple flips
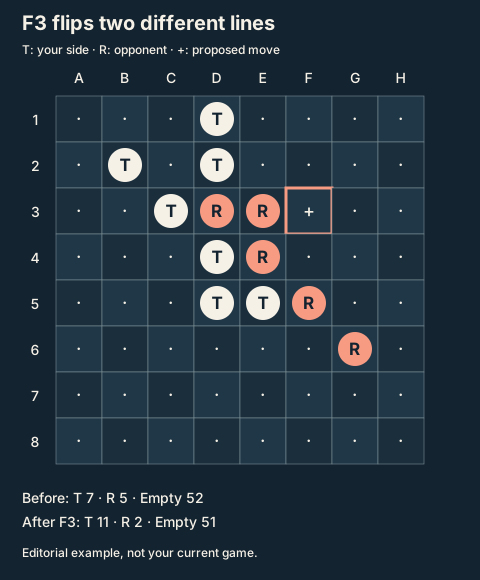
In our multi-direction position, T can play F3. Looking left captures E3 and D3. Looking diagonally down-left also captures E4. Three opposing discs therefore turn over from one placement. After that move, the board contains eleven T and two R discs, with fifty-one empty squares.
The new disc counts once even though it helps close two lines. Every bracketed line must be resolved; you cannot leave E4 unchanged because you preferred the horizontal capture. This position follows eight legal placements from the starting board. It is an example of the rules, not a screenshot of your current round.
| Row | A | B | C | D | E | F | G | H |
|---|---|---|---|---|---|---|---|---|
| 1 | · | · | · | T | · | · | · | · |
| 2 | · | T | · | T | · | · | · | · |
| 3 | · | · | T | R | R | + | · | · |
| 4 | · | · | · | T | R | · | · | · |
| 5 | · | · | · | T | T | R | · | · |
| 6 | · | · | · | · | · | · | R | · |
| 7 | · | · | · | · | · | · | · | · |
| 8 | · | · | · | · | · | · | · | · |
Separate a protected corner from a winning position
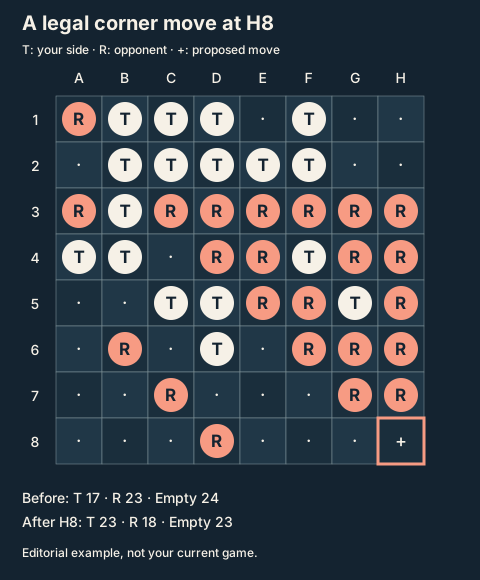
Another checked position offers T a move at H8. Along the diagonal, that placement flips G7, F6, E5, D4 and C3. The resulting count is twenty-three T against eighteen R, with twenty-three empty squares. H8 is a corner, so a later placement cannot get beyond it to bracket that disc.
This explains a corner’s special value, but does not prove that the move is best in every similar-looking position. The example demonstrates legality, rather than an exhaustive search of future play. There are still empty squares and possible replies. A useful protected disc is not the same thing as a guaranteed match result.
| Row | A | B | C | D | E | F | G | H |
|---|---|---|---|---|---|---|---|---|
| 1 | R | T | T | T | · | T | · | · |
| 2 | · | T | T | T | T | T | · | · |
| 3 | R | T | R | R | R | R | R | R |
| 4 | T | T | · | R | R | T | R | R |
| 5 | · | · | T | T | R | R | T | R |
| 6 | · | R | · | T | · | R | R | R |
| 7 | · | · | R | · | · | · | R | R |
| 8 | · | · | · | R | · | · | · | + |
Do not treat an edge as one long corner
An ordinary edge disc can still have squares on both sides along its row or column. It does not automatically inherit a corner’s protection. Before calling an edge disc safe, inspect the particular lines through it and consider whether an opposing placement could bracket it later.
Squares next to an empty corner deserve attention because a move there can open access for the other side. A large immediate capture may create that opportunity. A smaller capture may leave different replies. These are questions to ask of a position, rather than a rule saying that every edge square is good or every nearby square is always bad.
Distinguish a forced pass from the end
Our pass example contains twenty-two T discs, forty R discs and two empty squares. T has no legal move. R still has two: A8 and H8. The correct turn transition is therefore a pass by T followed by play for R, rather than ending the match just because T is blocked.
This separates three facts: disc counts, empty squares and legal moves for each side. None replaces the other two. The local game resolves forced passes. A side that still has a valid capture cannot choose to pass to avoid an uncomfortable move. The example’s two-side history is not a promise of a multiplayer option.
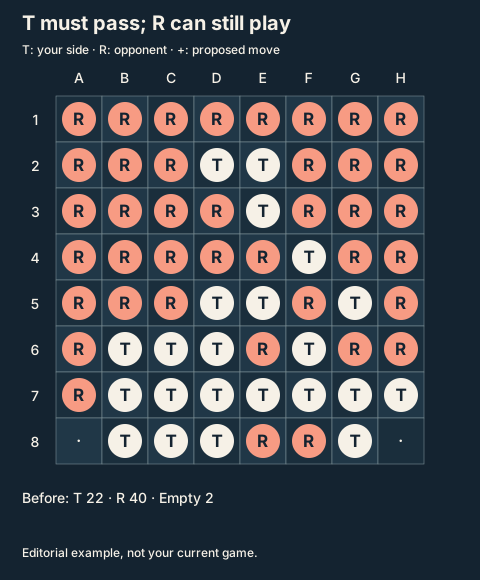
| Row | A | B | C | D | E | F | G | H |
|---|---|---|---|---|---|---|---|---|
| 1 | R | R | R | R | R | R | R | R |
| 2 | R | R | R | T | T | R | R | R |
| 3 | R | R | R | R | T | R | R | R |
| 4 | R | R | R | R | R | T | R | R |
| 5 | R | R | R | T | T | R | T | R |
| 6 | R | T | T | T | R | T | R | R |
| 7 | R | T | T | T | T | T | T | T |
| 8 | · | T | T | T | R | R | T | · |
Count an ending with one empty square
The illustrated early ending has fifteen T discs, forty-eight R discs and one empty square. Neither side can make a legal placement on that last square. Play ends with sixty-three discs present. R wins this position by the larger count, even though the board is not completely occupied.
Do not paint the remaining square a colour to round out the result. Nor should a player count squares they hoped to occupy. Only actual discs belong in the final total. To distinguish this position from a single forced pass, check both sides’ legal-move lists: both must be empty for the game to finish.
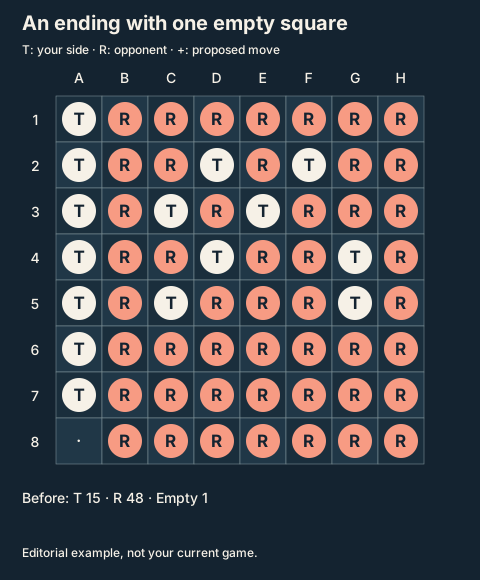
| Row | A | B | C | D | E | F | G | H |
|---|---|---|---|---|---|---|---|---|
| 1 | T | R | R | R | R | R | R | R |
| 2 | T | R | R | T | R | T | R | R |
| 3 | T | R | T | R | T | R | R | R |
| 4 | T | R | R | T | R | R | T | R |
| 5 | T | R | T | R | R | R | T | R |
| 6 | T | R | R | R | R | R | R | R |
| 7 | T | R | R | R | R | R | R | R |
| 8 | · | R | R | R | R | R | R | R |
Check when an equal count really is a draw
Our draw example ends with thirty-two discs on each side and no empty squares. Neither side can play. Equal counts in an open round would not establish a draw: the ending condition must be satisfied first. A tied final result is complete; it does not require adding a sudden-death move or another board.
When reviewing your own round, use the count at the actual finish and identify what supports it. A board can look visually balanced while its totals differ. In these diagrams, you can count the printed symbols and compare them with the stated totals. That simple check is safer than estimating how much space each colour appears to fill.
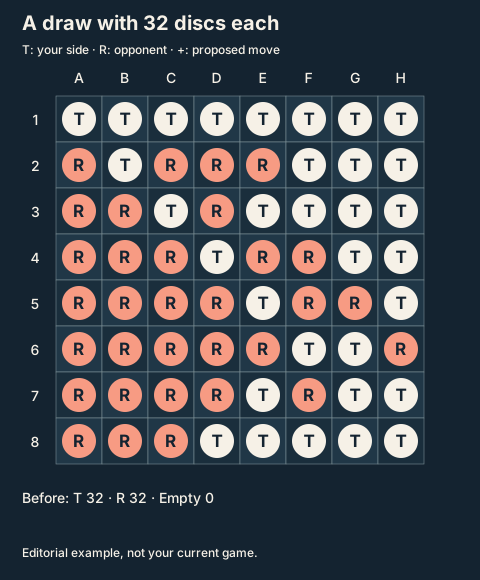
| Row | A | B | C | D | E | F | G | H |
|---|---|---|---|---|---|---|---|---|
| 1 | T | T | T | T | T | T | T | T |
| 2 | R | T | R | R | R | T | T | T |
| 3 | R | R | T | R | T | T | T | T |
| 4 | R | R | R | T | R | R | T | T |
| 5 | R | R | R | R | T | R | R | T |
| 6 | R | R | R | R | R | T | T | R |
| 7 | R | R | R | R | T | R | T | T |
| 8 | R | R | R | T | T | T | T | T |
Compare two choices without mixing their outcomes
Begin with the current side’s legal squares and exclude the rest. Pick two candidates and explain at least one closing line for each. Work through their resulting boards separately. Do not combine the discs flipped by one possible move with the discs that would change under the alternative.
For each result, look for available corners and opposing replies. Count captures, but make that number one part of the comparison. This routine does not guarantee an optimal move or replace a solver. Its purpose is to make your assumptions explicit, especially when you may have overlooked an empty square in an imagined capturing line.
Diagnose mistakes before memorising an opening
When a square will not accept a disc, look for a specific reason. It may be occupied, lack a run of opposing discs, contain a gap in the proposed line or have no friendly closing disc. For a diagonal, follow both row and column together so that the line does not quietly drift to a neighbouring square.
If the count surprises you, separate the newly placed disc from the discs that flipped, then check every direction. If the opponent plays again, ask whether a forced pass explains the turn change. Understanding one such mistake is more useful than copying a long sequence without knowing why its moves were legal.
Turn an example into a small practice question
You can practise just the first placement and its reply, then stop. Alternatively, choose the focused page on corners or forced passes and take one question into your next round. You do not need to reproduce the full game that led to a sample position or commit to a fixed length of break.
The explanations and boards here are original. General capture, pass and ending rules were cross-checked against the World Othello Federation’s rules reference; the local interface and computer opponent belong to Break Club. This is not a claim of affiliation, tournament certification, health benefits or improved work performance from playing.
Sources and context
Frequently asked questions
What do T and R mean in these examples?
T identifies your side and R the opponent. Columns run A–H left to right; rows run 1–8 from the top. These are editorial labels.
Can a flipped disc turn back later?
Yes, if a later opposing placement brackets it legally. A disc in a corner cannot be bracketed.
Can I choose which lines to flip?
No. A move flips all opposing discs bracketed along its valid straight lines.
Does this guide predict the computer’s next move?
No. It demonstrates legal positions and sequences, rather than analysing your live board or replaying the computer opponent.
Must all 64 squares be occupied?
No. The game ends when neither side can move, including positions with empty squares.